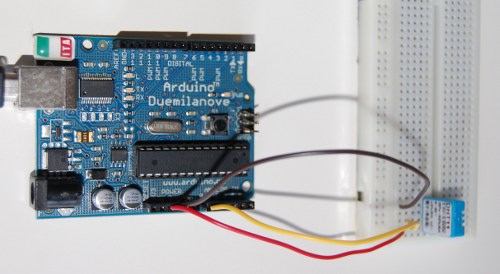
The dht11 humidity sensor is an economic way to sense the humidity of the air in arduino projects, and what is better, you can skip the stores that sells them sticked in a small piece of pcb, and cost ~6€/$, and instead buy them bulk in ebay half of the price.
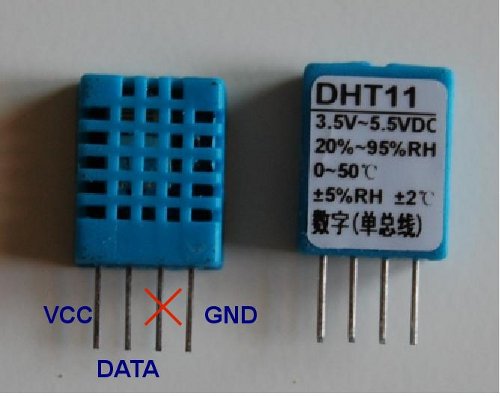
Once you’ve got your sensor you’ve to connect it to your arduino, all you need is to connect the GND and VCC legs to corresponding pins in your arduino, and then choose one digital pin for the data line of the sensor. The data pin in the dht11 is which is next to the VCC pin, the other pin is simply not connected to anything.
The protocol that the sensor uses to send the data is not very standard, but in the following datasheet you can find the details and timings to use to effectively communicate with it:
Now is time for the code. I’ve borrowed it from the sheepdogguides guides similar article, but cleaned all the unnecessary text and hold the good explanation comments. Grab it from the following link:
Open it with your arduino IDE, change the ‘dht_dpin’ definition in case you’re using other pin than digital 14 (also known as analog 0), and press upload. The code will be compiled without errors and uploaded to the board in seconds. Now open the Serial Monitor and you should see this:
You have to know that the sensor doesn’t send the decimal part of humidity and temperature readings, because the resolution for both measures is 1.0 unit (1ºC and 1%RH).
Sources: arduino playground and sheepdogguides


2 replies on “Interfacing Arduino with a DHT11 humidity sensor”
Many thanks for your post – it was very helpful with my small project for X-mas gift 🙂
However, you have a mistake in your code:
byte bGlobalErr; //for passing error code back from complex functions.
byte dht_dat[4]; //Array to hold the bytes sent from sensor.
and
for (i=0; i<5; i++)
dht_dat[i] = read_dht_dat();
You're writing the chechsum into bGlobalErr (array is only 4 bytes long, so the 5th byte happens to be bGlobalErr), so the code keeps reporting errors.
You can also add info about Serial Monitor (it took me a while to realize it’s not RS-232 serial, but Arduino specific implementation). Just Ctrl+Shift+M 🙂
@Jovik, thanks for the report, I would upload a fixed file and also report to the original author the problem 😉